The core
Sixty Four is a game written in Javascript with all its good and bad. Javascript is not really meant for real-time game performance from the beginning. I’ve kept this in mind every time I needed to decide how to implement one thing or another.
Since there is nothing fancy to load at the start, the game initialization takes only 200 milliseconds. Most of the startup time is taken by the Electron shell. The game code is subdivided into 7 parts, which are stored in separate files: UI logic, sprite system, Bezier curves logic, machines logic, game data, language data, and the main game logic. All of these are loaded into the memory at the startup with all the images and sounds. The only exceptions are the music files and the final video file, which are loaded on demand.
After the game is initialized, there are two main loops. The first is abstract logic, where all the stuff is just a bunch of numbers affecting each other. The second one is rendering: everything that has been calculated is presented to the player on the screen. Basically, the loop is a bunch of commands, which are meant to be executed repeatedly many times per second. The faster the better for the logical loop, and the second one should be synced with the screen refresh rate.
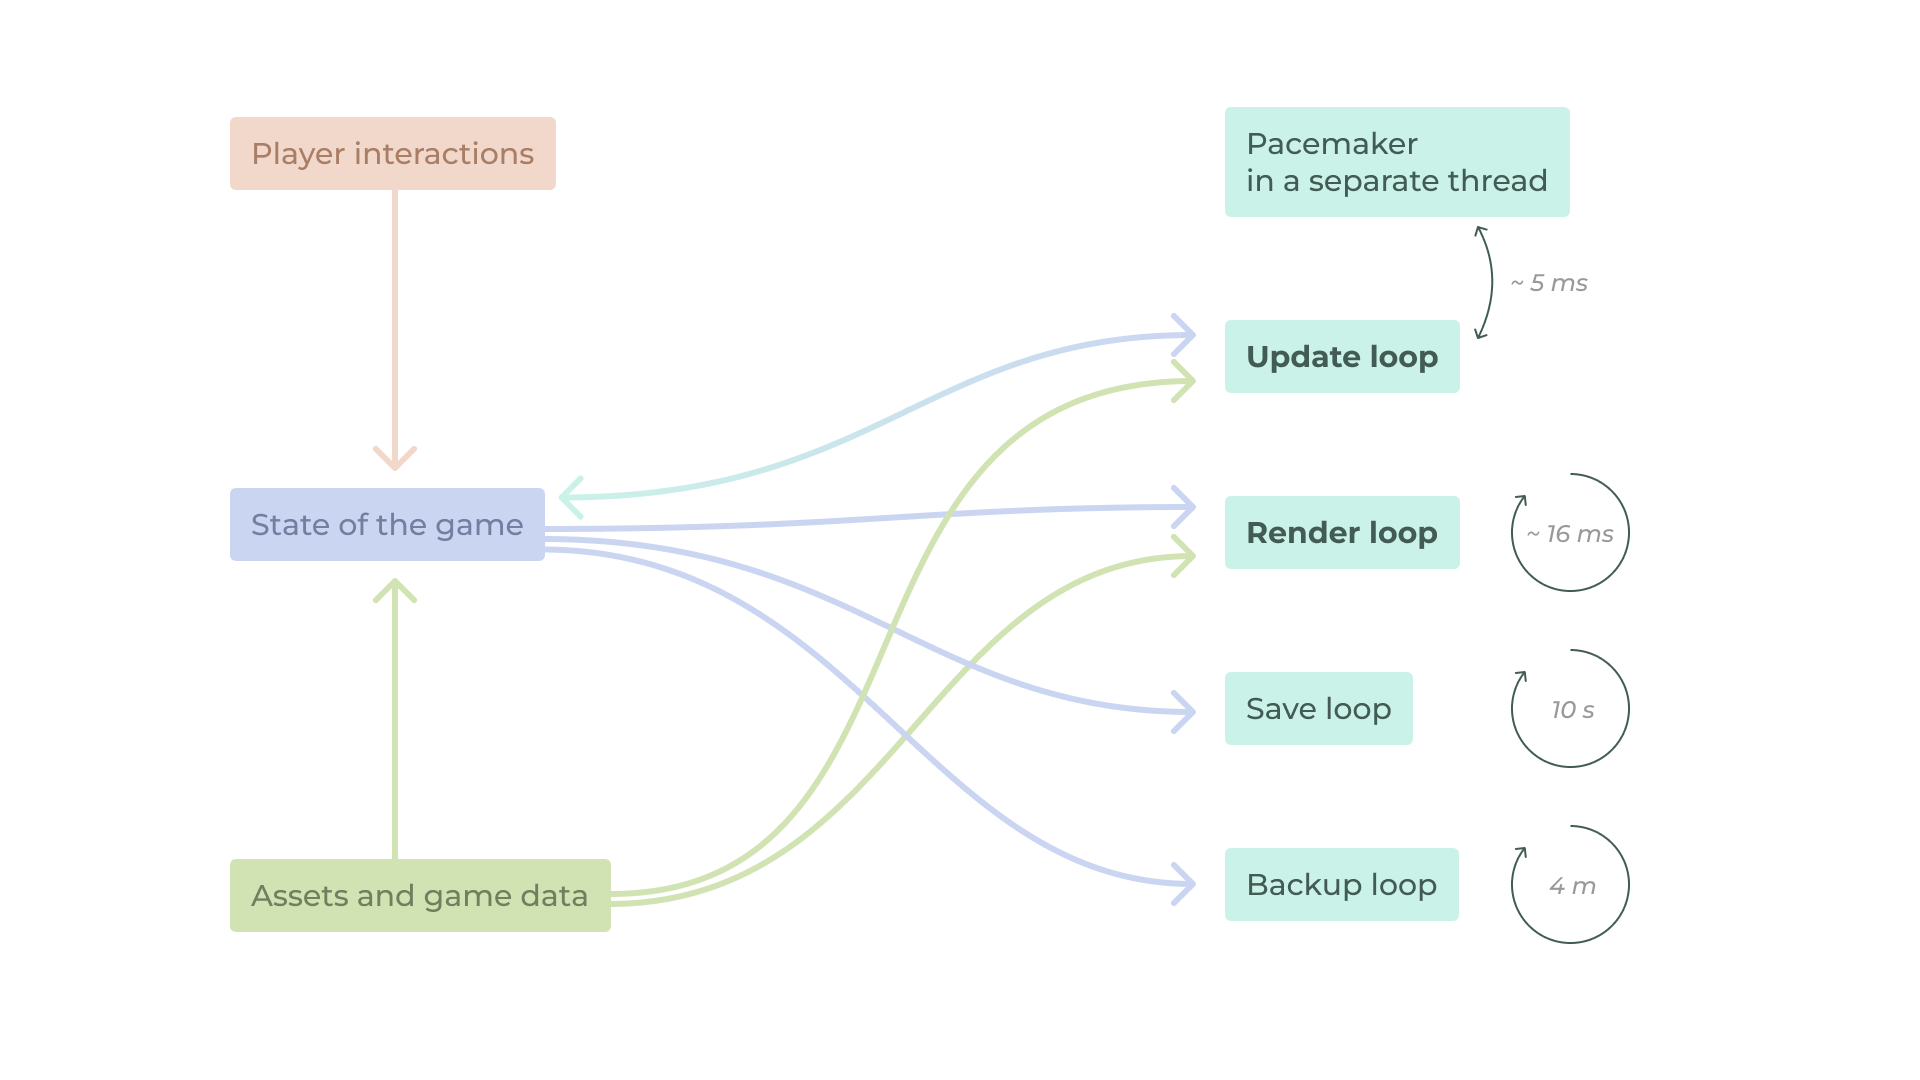
I was worried about the main update loop: with lots of machines and their complex interactions, it looked like it could be heavy on performance in the late game. But surprisingly, this was not the case. There was an initial idea to additionally split the main game loop into two parts: the fast one with at least 60 fps, which should respond immediately to any changes, and the slow one, something around 1 fps, which should process things like achievements, the state of the store, etc. After some testing, I decided to keep just the first loop since it appeared that even if it was five times slower, it was fast enough. That is what exactly happens in this loop:
- The game checks for any changes in inputs from the possible controller
- Checks if there is anything that could trigger a new line in the dialogue
- Loops through remaining achievements to see if something should be triggered
- Checks if there is a hint in the small tutorial that should be shown
- Updates the state of a time-warp event if there is one
- Loops through all the entities to update their state, finds all the machines which are ready to be refilled, and sorts the list depending on a coordinate in the game to render them properly later.
- The game has resources that interact in “inventory”, so the game gives an update to their state
- Updates the state of the visual effects, like sparks or resources flying to/from inventory
- Updates the state of global flashes that occur from time to time
- Calculates the position of the scene depending on the input from the controls
- Updates pan and loudness of the sound effects that are currently playing
- Updates the visual state of resources in “inventory” (they pop when something is added)
- Checks if it’s time for the autoclicker to click something
- Updates the state of surges
- Updates analytics: the speed of resources mining and spending
- Updates the music state
- Sends a message to the in-game pacemaker to tell it’s ready for the new update
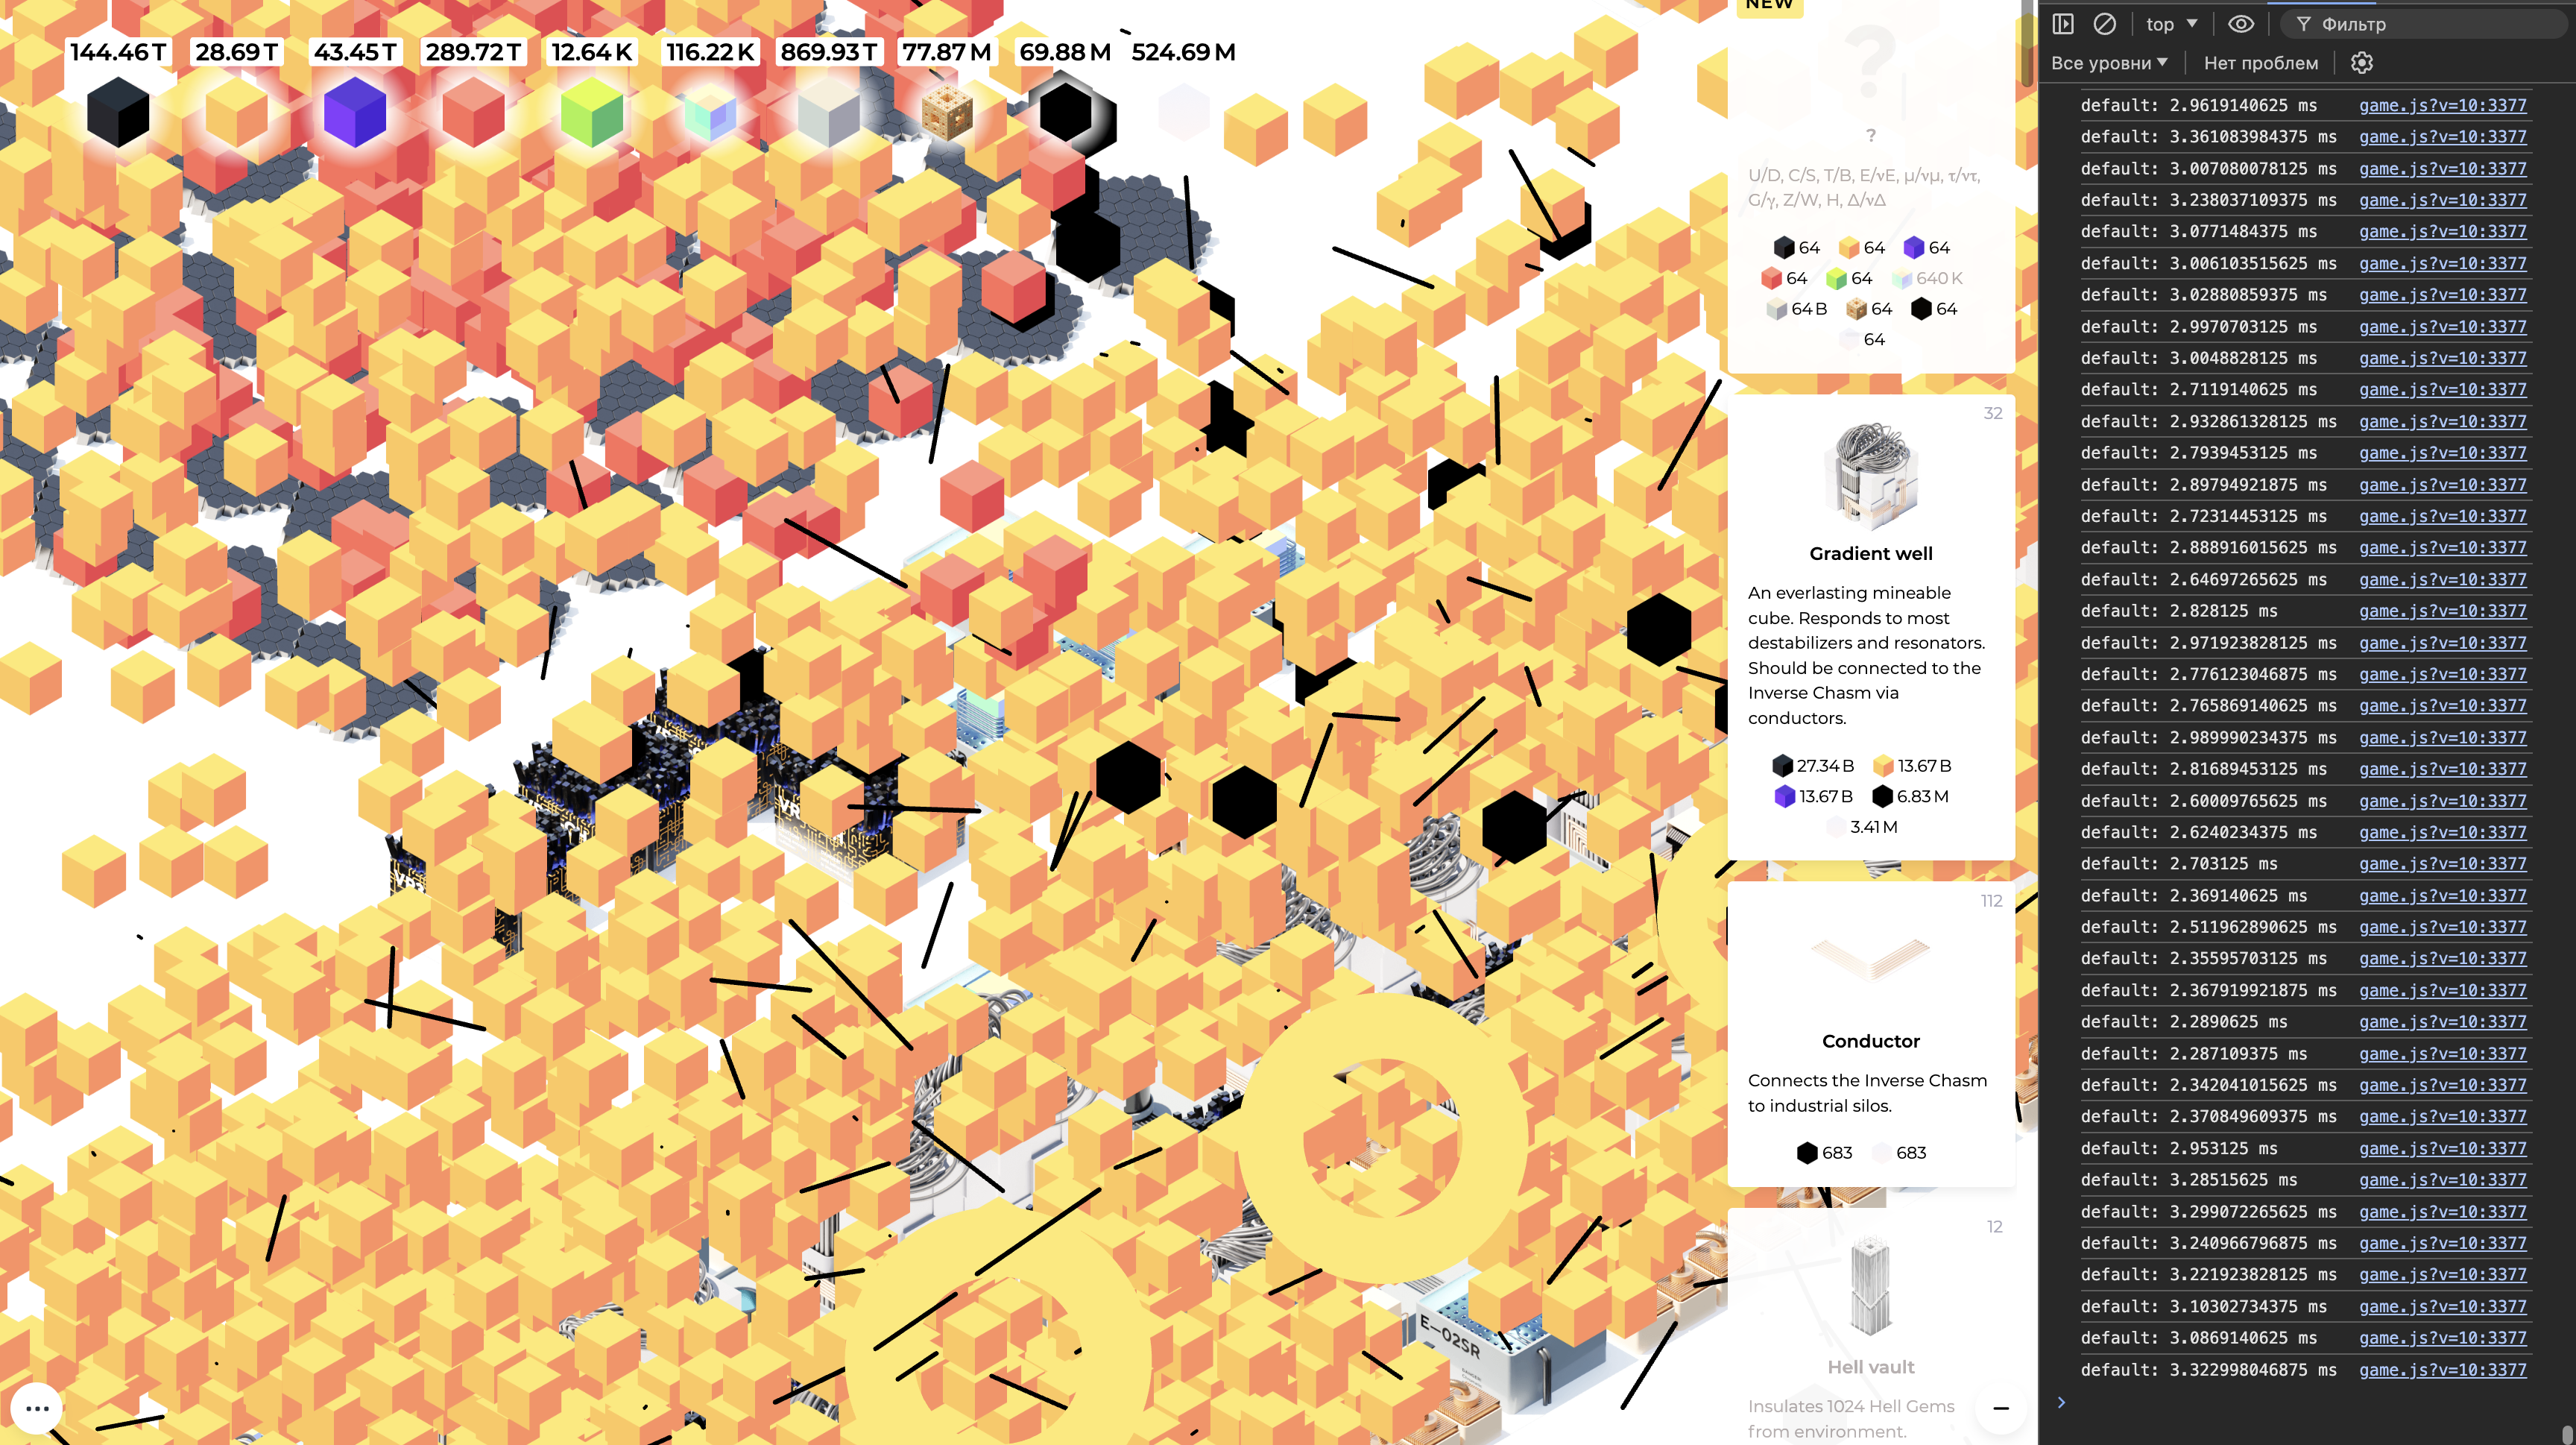
Performance testing showed that this update takes less than a millisecond in general on my laptop. It means that in theory, the game can run over 1000 fps if you ignore the graphics part.

One of the reasons for this is that the game uses a spatial hash map of every entity in the game, so you never need to loop through entities to find something in the desired location. Say you have a mouse cursor over the screen coordinates [1256, 713]. With a simple transform, it is converted into the world coordinates, like [-13.2, 8.81]. To check if there is some entity at these coordinates, round it to [-13, 8] and check the map: if there is an entry with the name “u-13v8”, that’s our guy. All you need to do is to keep the map updated when adding or deleting entities. And there are lots of entity coordinate checks in the game to calculate interactions between machines.
The visual part is much more heavy on the performance than the logical one. There were two options for the browser engine to handle the graphics: 2d canvas or WebGL. WebGPU was non-existent at the moment I started to work on the game. 2d Canvas is slow but simple and straightforward. WebGL is much more performant but tricky to handle. You could see for yourself the performance of the same task executed on CPU (2d Canvas) and GPU (WebGL), just move the cursor over the shape:
https://sunandstuff.com/scattercpu/
https://sunandstuff.com/scattergl/
I tried both and decided to keep 2d Canvas since I planned to use a lot of its built-in drawing functions and didn’t want to be stuck on simple problems with WebGL. Besides, I performance-tested Canvas with lots of stuff on the screen and it looked good enough, even with CPU throttling. Just a couple of milliseconds on my laptop, while for 60fps you have a capacity for at least 10 more.
That’s what exactly happens in each render frame:
- Fill the screen with a solid white or black color depending on the location in the game.
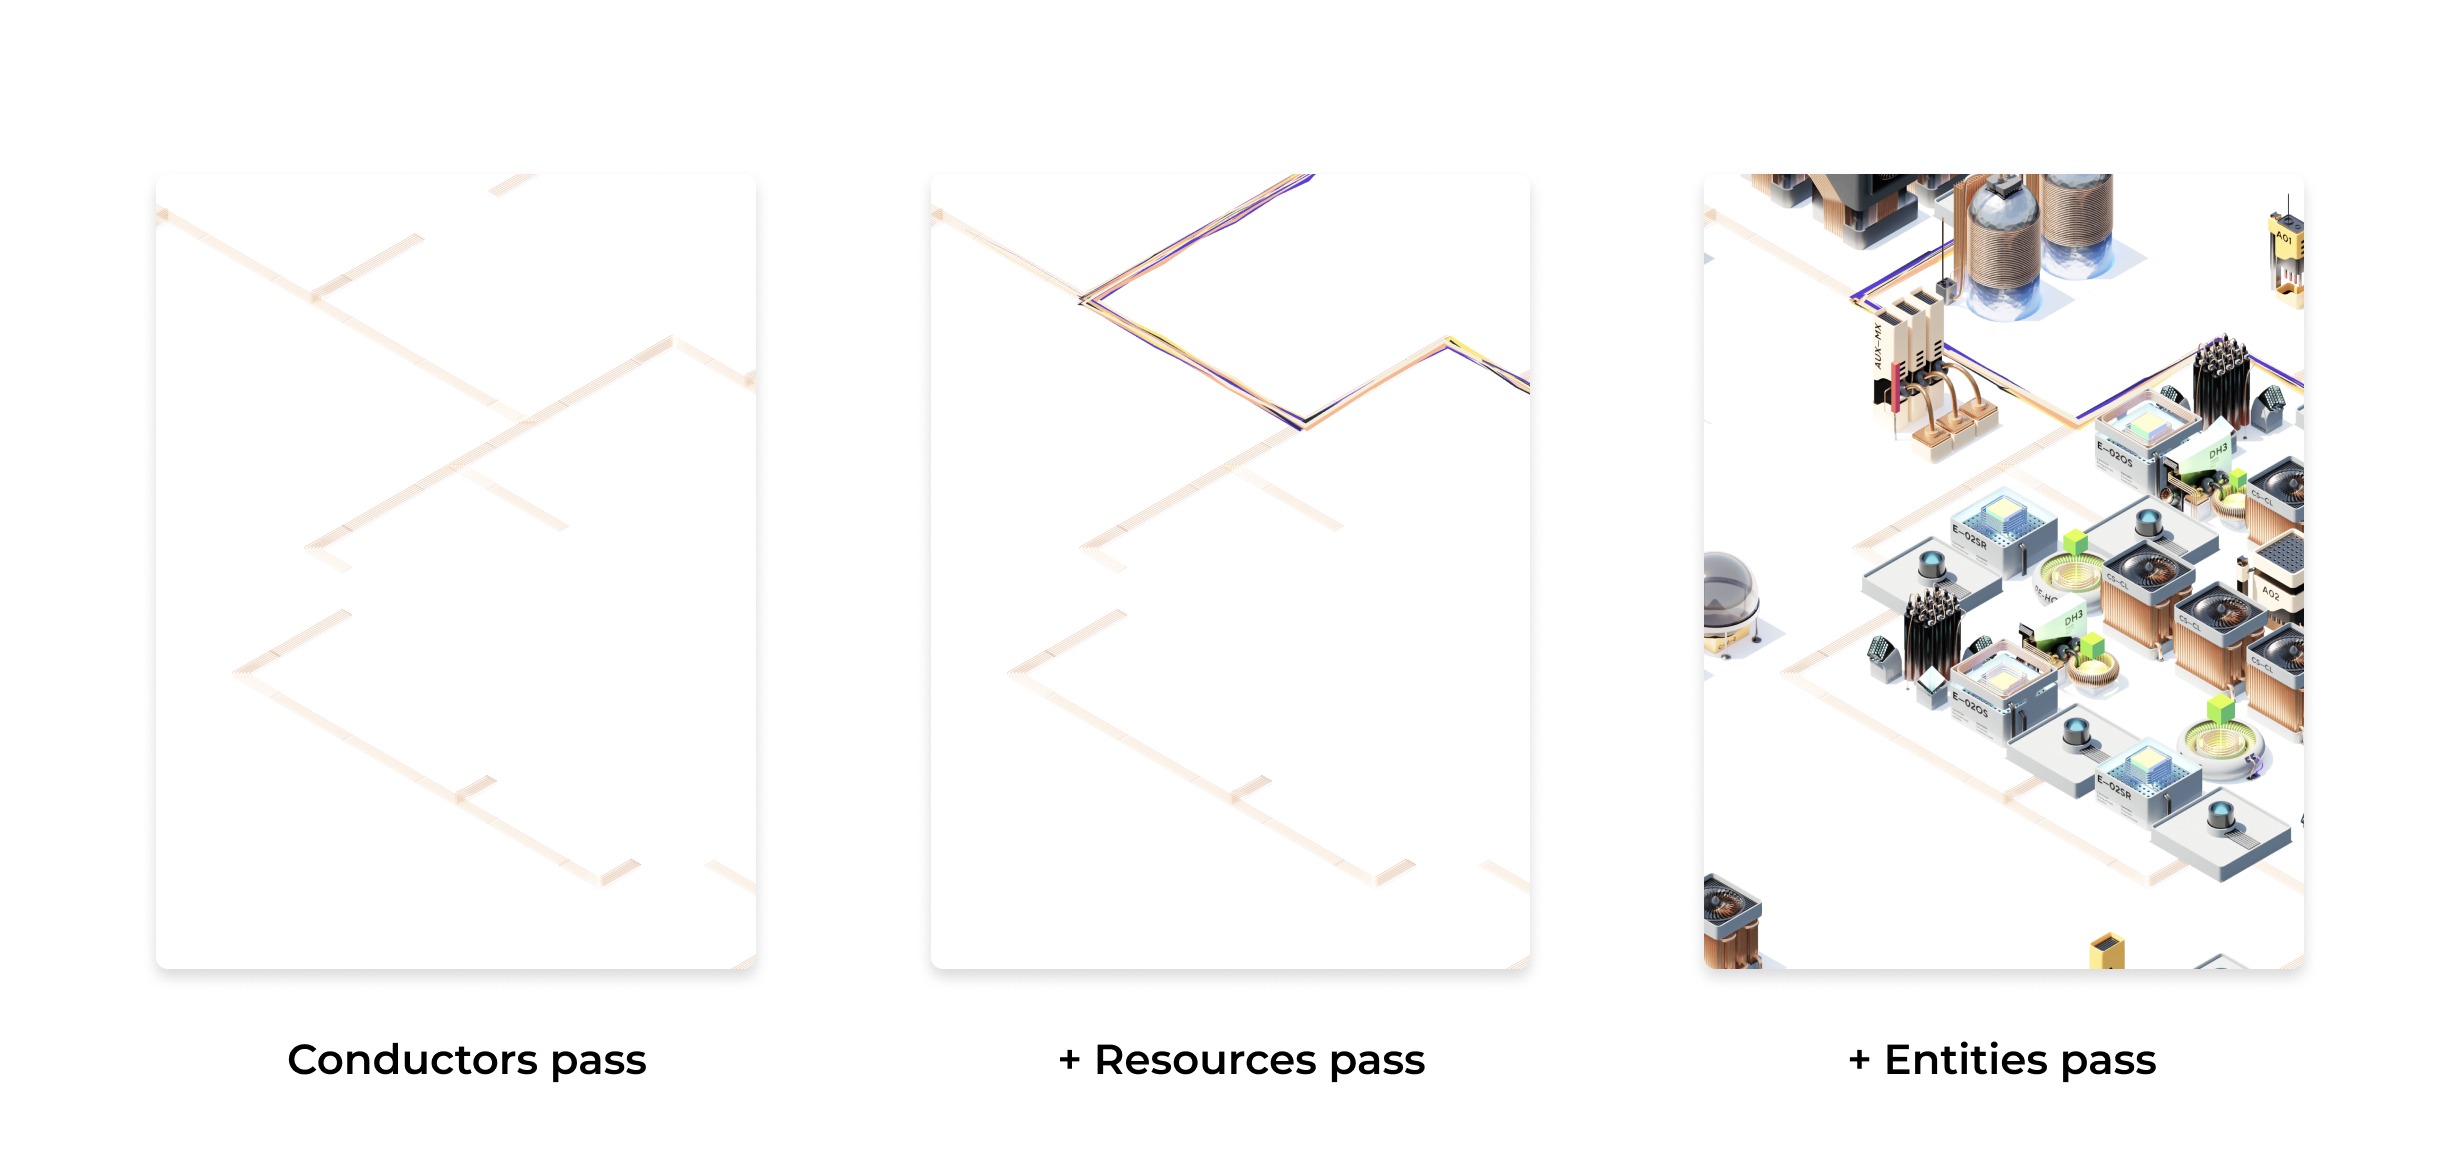
- Draw all the conductors if there are any.
- Draw resources flowing over the conductors.
- Draw the rest of the entities one by one. All the entities are sorted in a game update loop depending on the coordinate, so “upper” entities would be drawn first followed by lower ones. This emulates the same effect as a depth buffer in 3d games and creates an illusion of 3d by hiding some machines behind the other ones.
- If the alt button is pressed on the keyboard, fill the screen with semi-transparent white and draw the entity which is being hovered one more time highlighting its neighboring cells and showing hints if the neighboring entities interact with the hovered one.
- If there is an entity in the player’s hand, paint a hovered cell in green/red color, and draw the entity (again, highlighting its neighboring cells and showing hints if the neighboring entities interact with the hovered one).
- Draw the final building VFX if there is one.
- Draw all the visual effects.
- Draw Inverse Chasm lines.
- Draw resources in inventory.
- Fill the screen with semi-transparent yellow if there is a time-warp event.
- Draw the cursor.
- Update current tooltip position if there is one.
- Draw a “darkish mode” mask if needed.
There are two more loops to the game actually, but they are quite straightforward: the save loop saves the game every 10 seconds and the backup loop stores the save in backups every 4 minutes.
That’s it for the basic structure of the game, but there are a few more tricks I want to share.
Tricks
You may have noticed a weird sequence in the render loop: draw conductors, draw resources over conductors, draw everything else. The reason for that is if everything is rendered in a single pass, resources flowing over conductors are drawn on top of both conductors and other entities, but in fact, should be rendered behind the latter. So everything must be drawn in in layers.
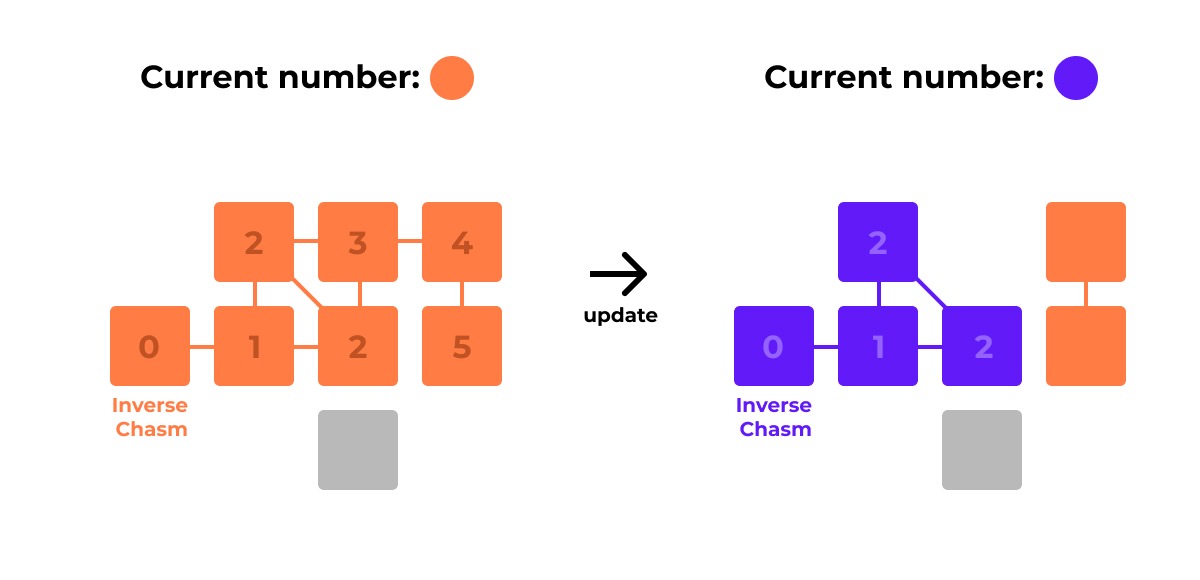
There’s a cost-saving trick for updating the resource network. You can consider resource network as a graph, which consists of entities, that may be connected between each other or not. Entity is considered connected to the resource network itself if there is a path from this entity to the special entity named Inverse Chasm through other nodes. Each time this graph changes (say we delete one of the nodes), every entity in this graph should know if it is still connected or not. To achieve this, the game has a variable with a number, which increments each time the network changes. This number is assigned to the Inverse Chasm on update and then propagated to every connected machine (naive flood fill). After that, if a machine has a number different from the current one, it is considered disconnected. This way you don’t have to iterate through every possible machine to see if it’s connected to the network. As a bonus, you have a direction for the resource flow “for free” by storing the distance from the Inverse Chasm to the entity while flood-filling.
All the visual effects, like the paths of resources flying, resources lines, and sparks are based on Bezier splines calculated at the moment of their creation. To get a new coordinate for each effect you only need to divide the time passed from the start of the animation by the total time of the animation and plug this number into the premade cubic bezier formula. It’s very efficient since calculating the position on Bezier spline is just a couple of additions and multiplications and the resulting paths are predictable and neat.
Each cube is composed of 64 smaller cubes. But only 37 cubes directly visible on the screen are drawn. Additionally, to look like a 3d cube, the small cubes should be drawn in a specific order. I use this one:

There’s a kind of texture instancing in the game to save up memory. Each image is loaded only once and used by multiple sprites by drawing the needed part from the original image. The same goes for the sounds.
Some sprites with dynamic contents consist of three layers. The background layer is drawn first, then the dynamic contents, such as a resource cube, and then the top layer which can obscure the middle one.
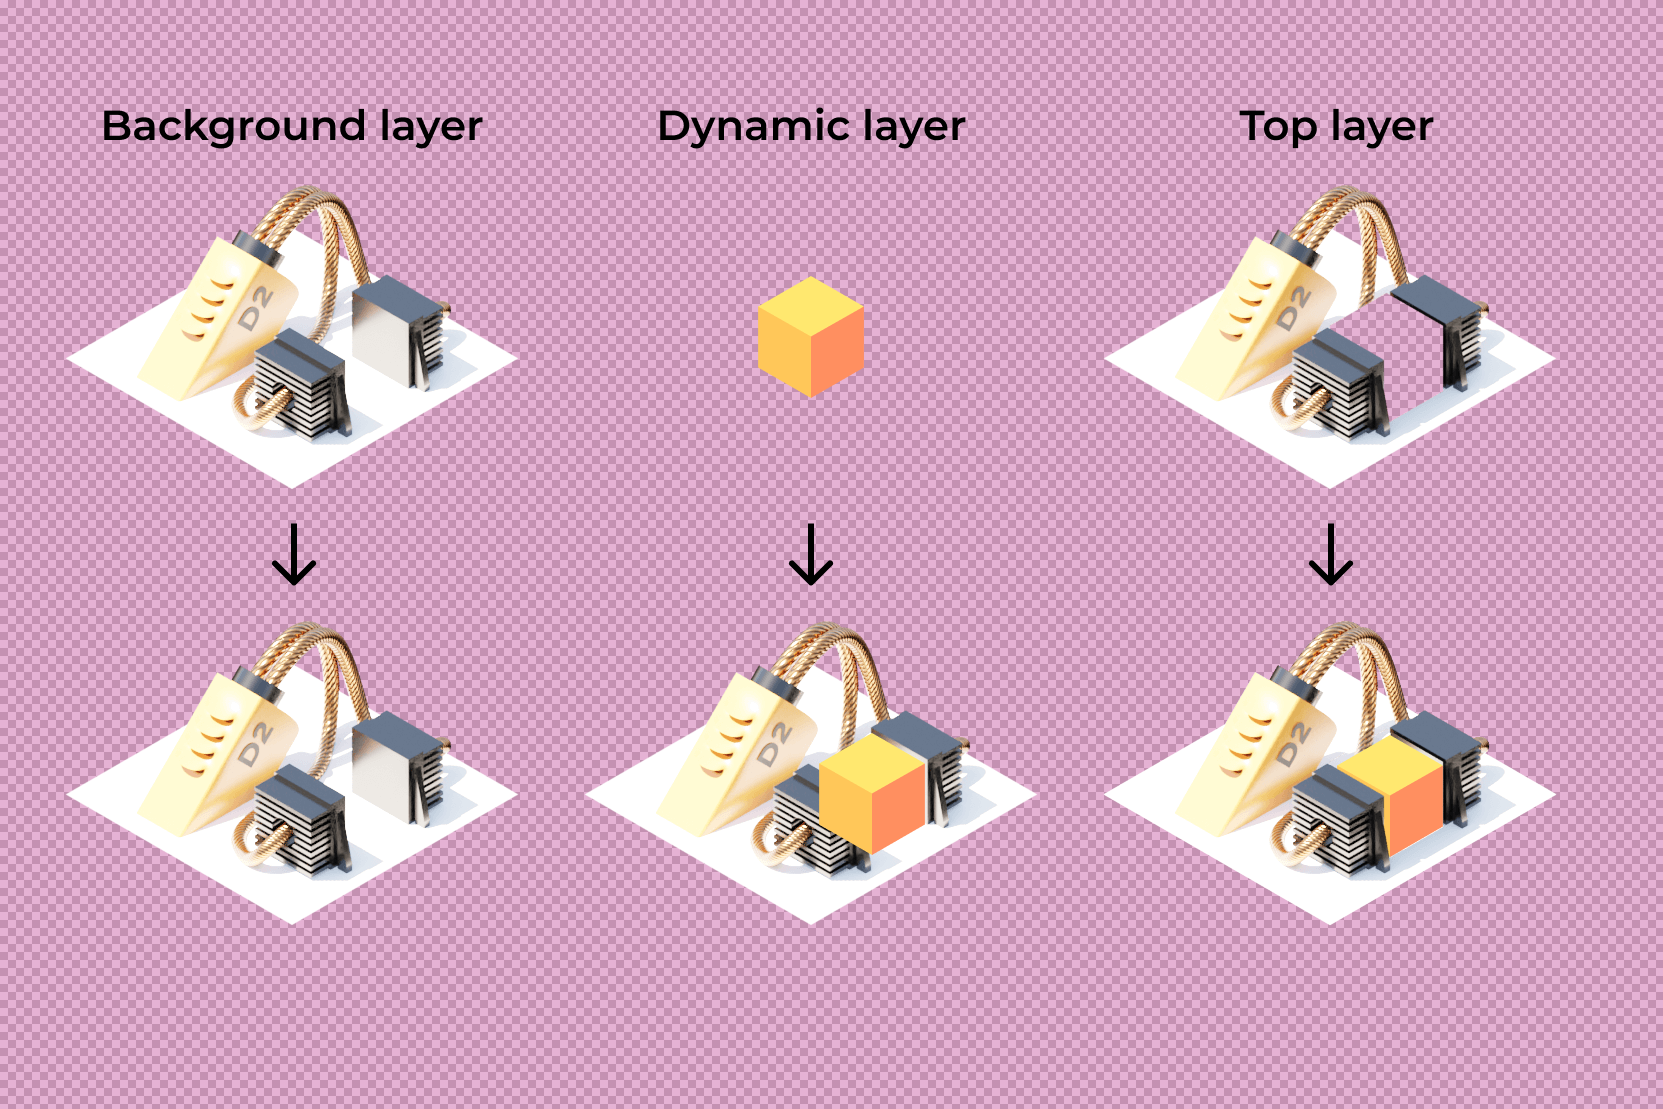
This way you can avoid using huge spritesheets containing all the prerendered states.
The last thing I want to tell is how the assets for the game was made.
Visuals
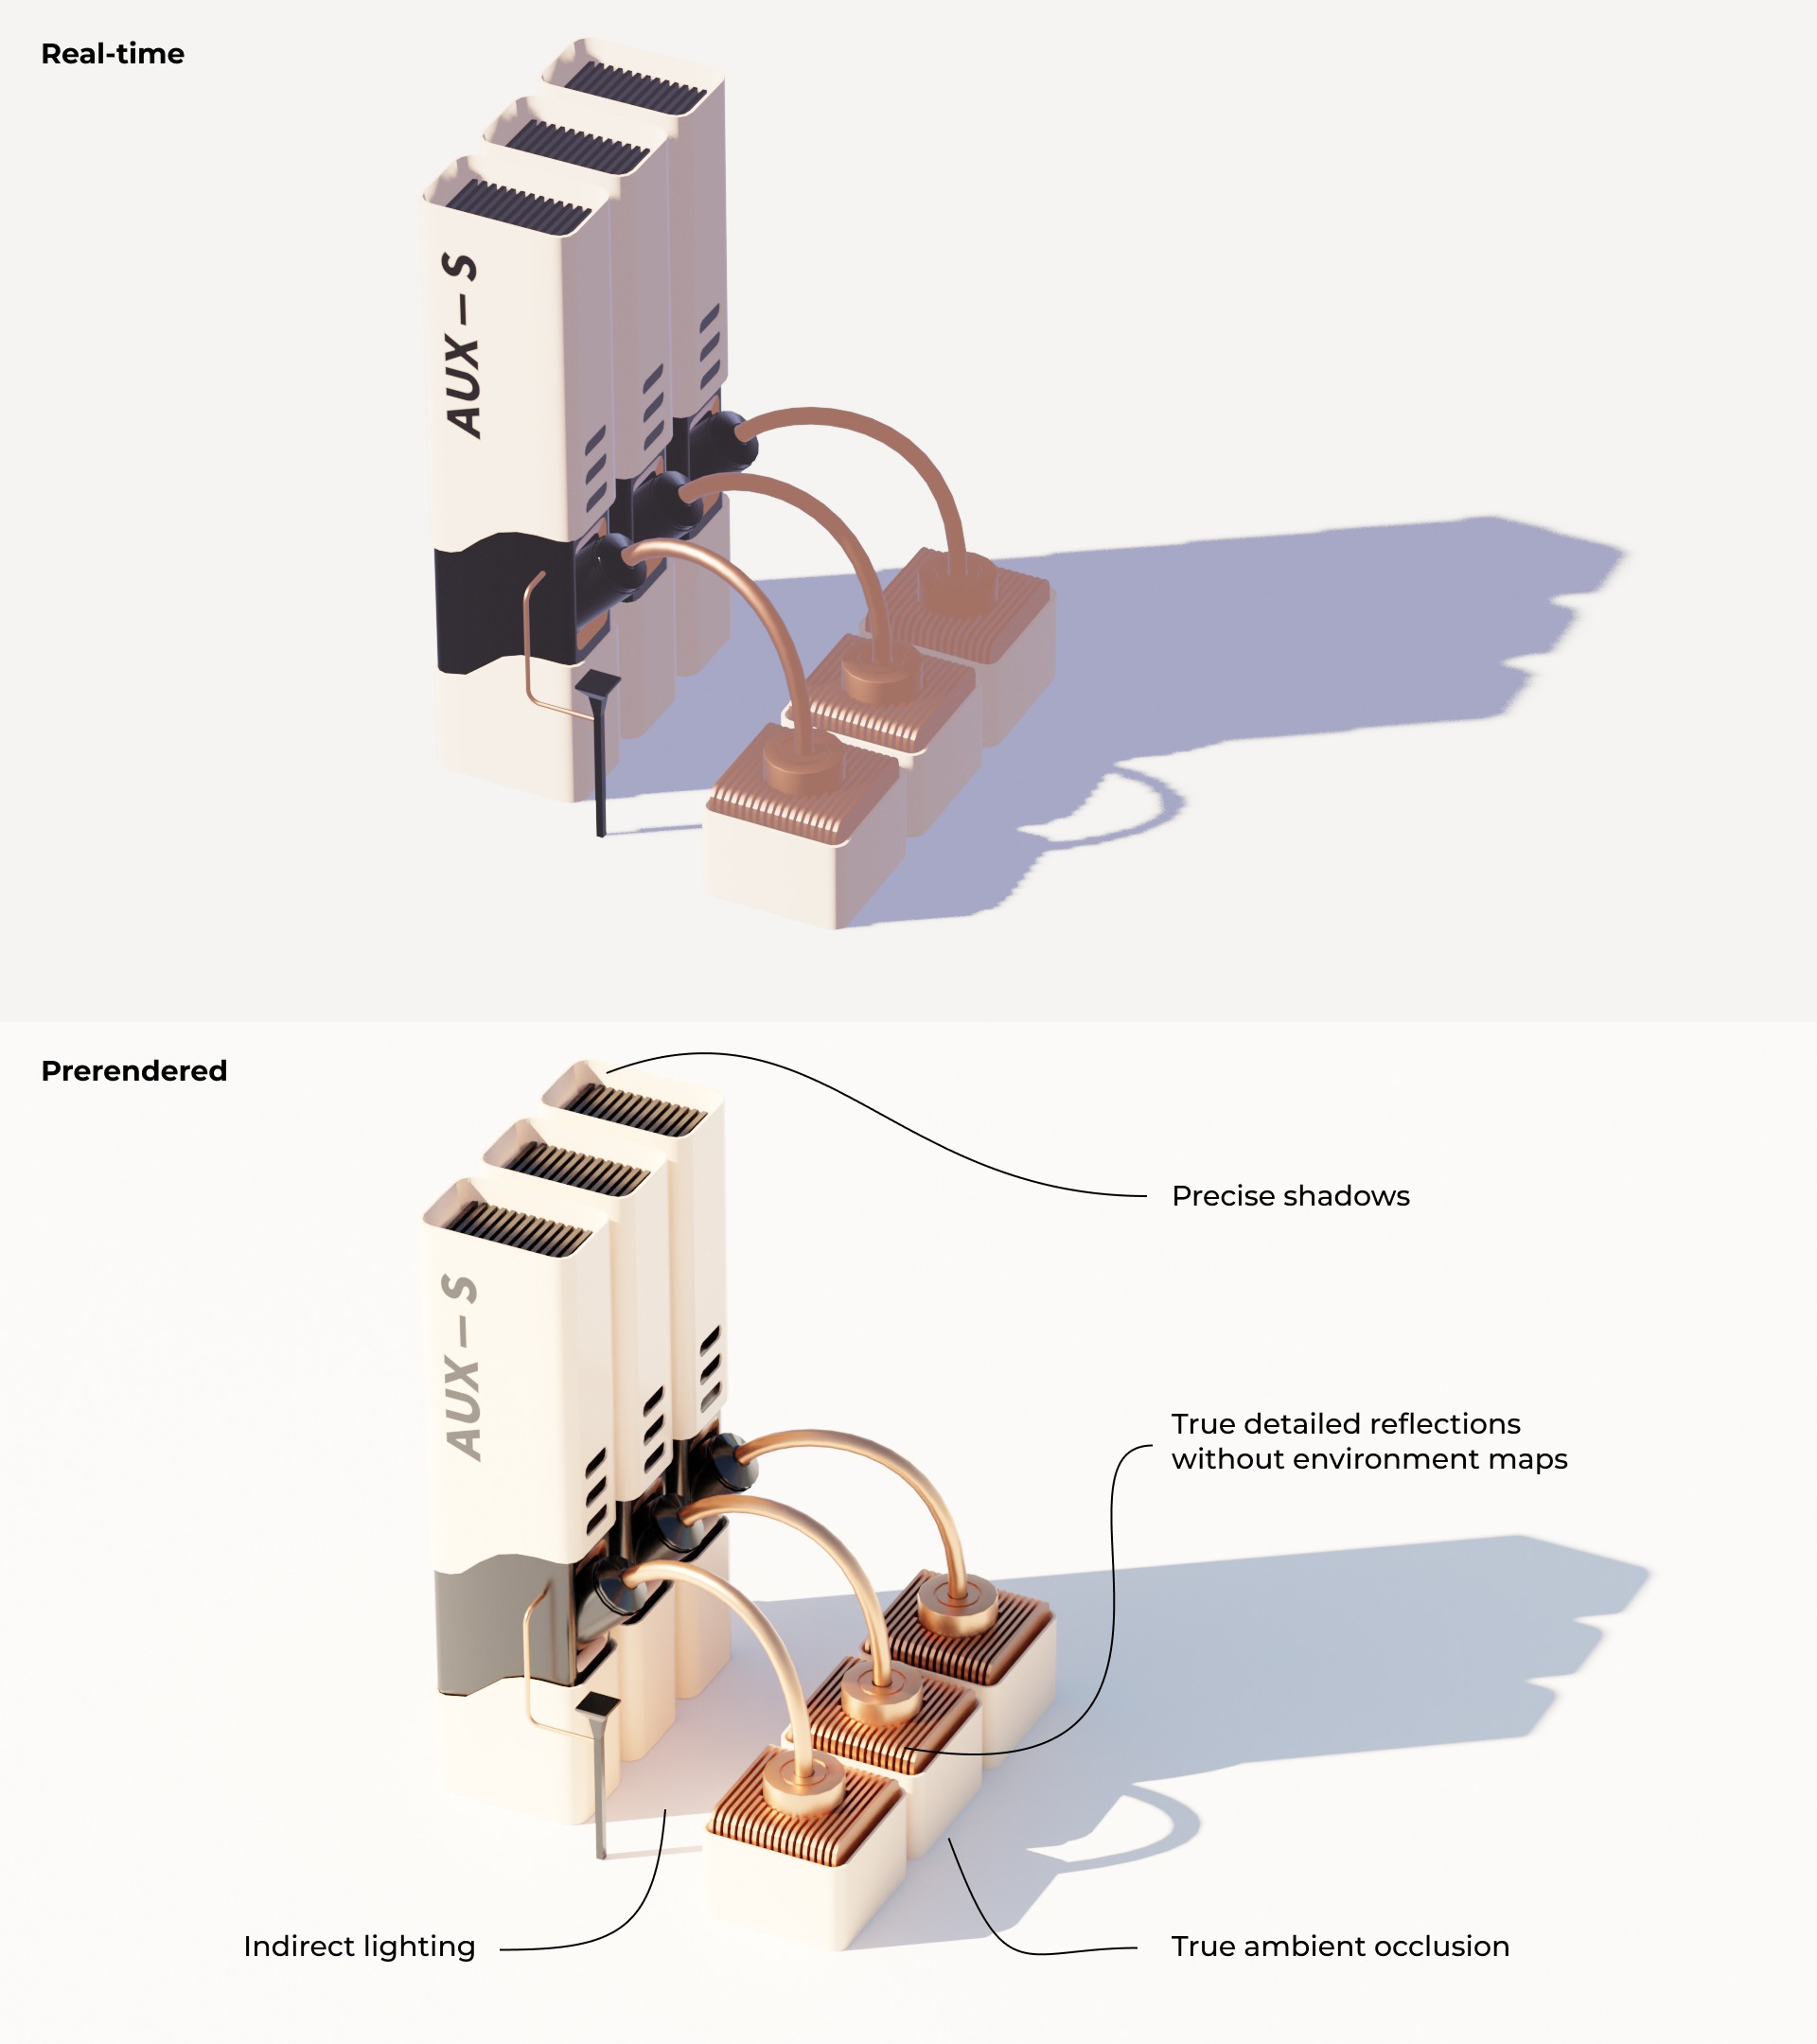
There was basically a choice between prerendered sprites and real-time 3d models (which imply WebGL). 3d gives a huge versatility in camera positions, smooth animation and dynamic environment conditions. The main advantages of sprites is the performance cost and the quality of lighting. Since the game uses a single camera angle and the environment is static, sprites are the go-to choice. A few people asked me if the game is 3d or not, so I guess the choice was right.
The biggest advantage of prerendered graphics is realistic lighting. Calculating the illumination is very costly. It has been a nemesis for 3d games for ages. In reality indirect lighting does most of the job in global illumination, but for real-time graphics it’s too much stuff to handle in a single frame.
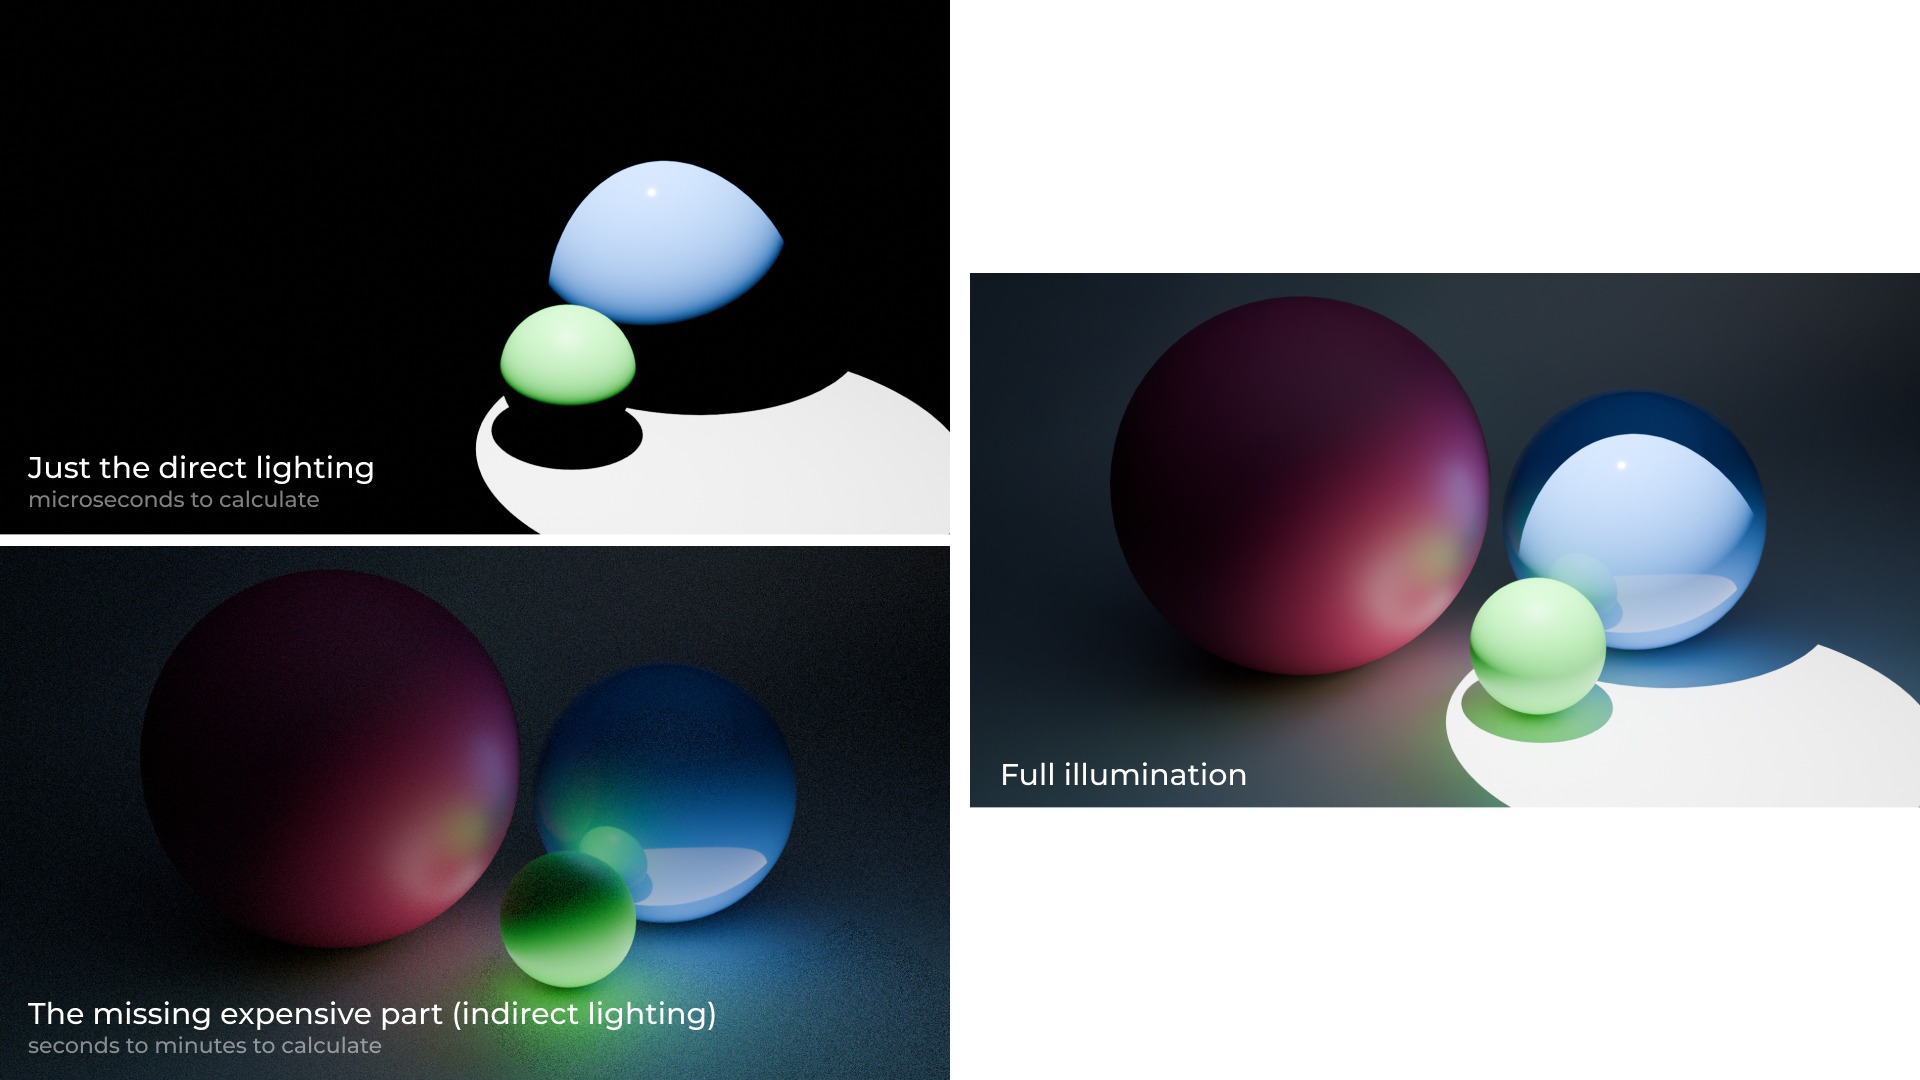
Until the recent advancements in ray tracing, the only option was to fake it by pre-baking the lighting into the texture. But for prerendered graphics this is not a problem at all. You have all the time in the world for Blender to calculate every speck of light in the scene and produce a pretty image.
It’s fair to say though, that if the lighting in the scene doesn’t change, you can get the near-perfect “fake” result even with real-time 3d.
All the assets in the game was rendered in the same lighting setting with the simulated sunny environment and the blue sky. Big part of the lighting is done by the reflected light from the white surface under the machines. I was asked a couple of times why don’t I just change the background to black for the dark mode. And the answer is this: with the black background lighting in the game would make no sense, because white surface is one of the two main light sources.
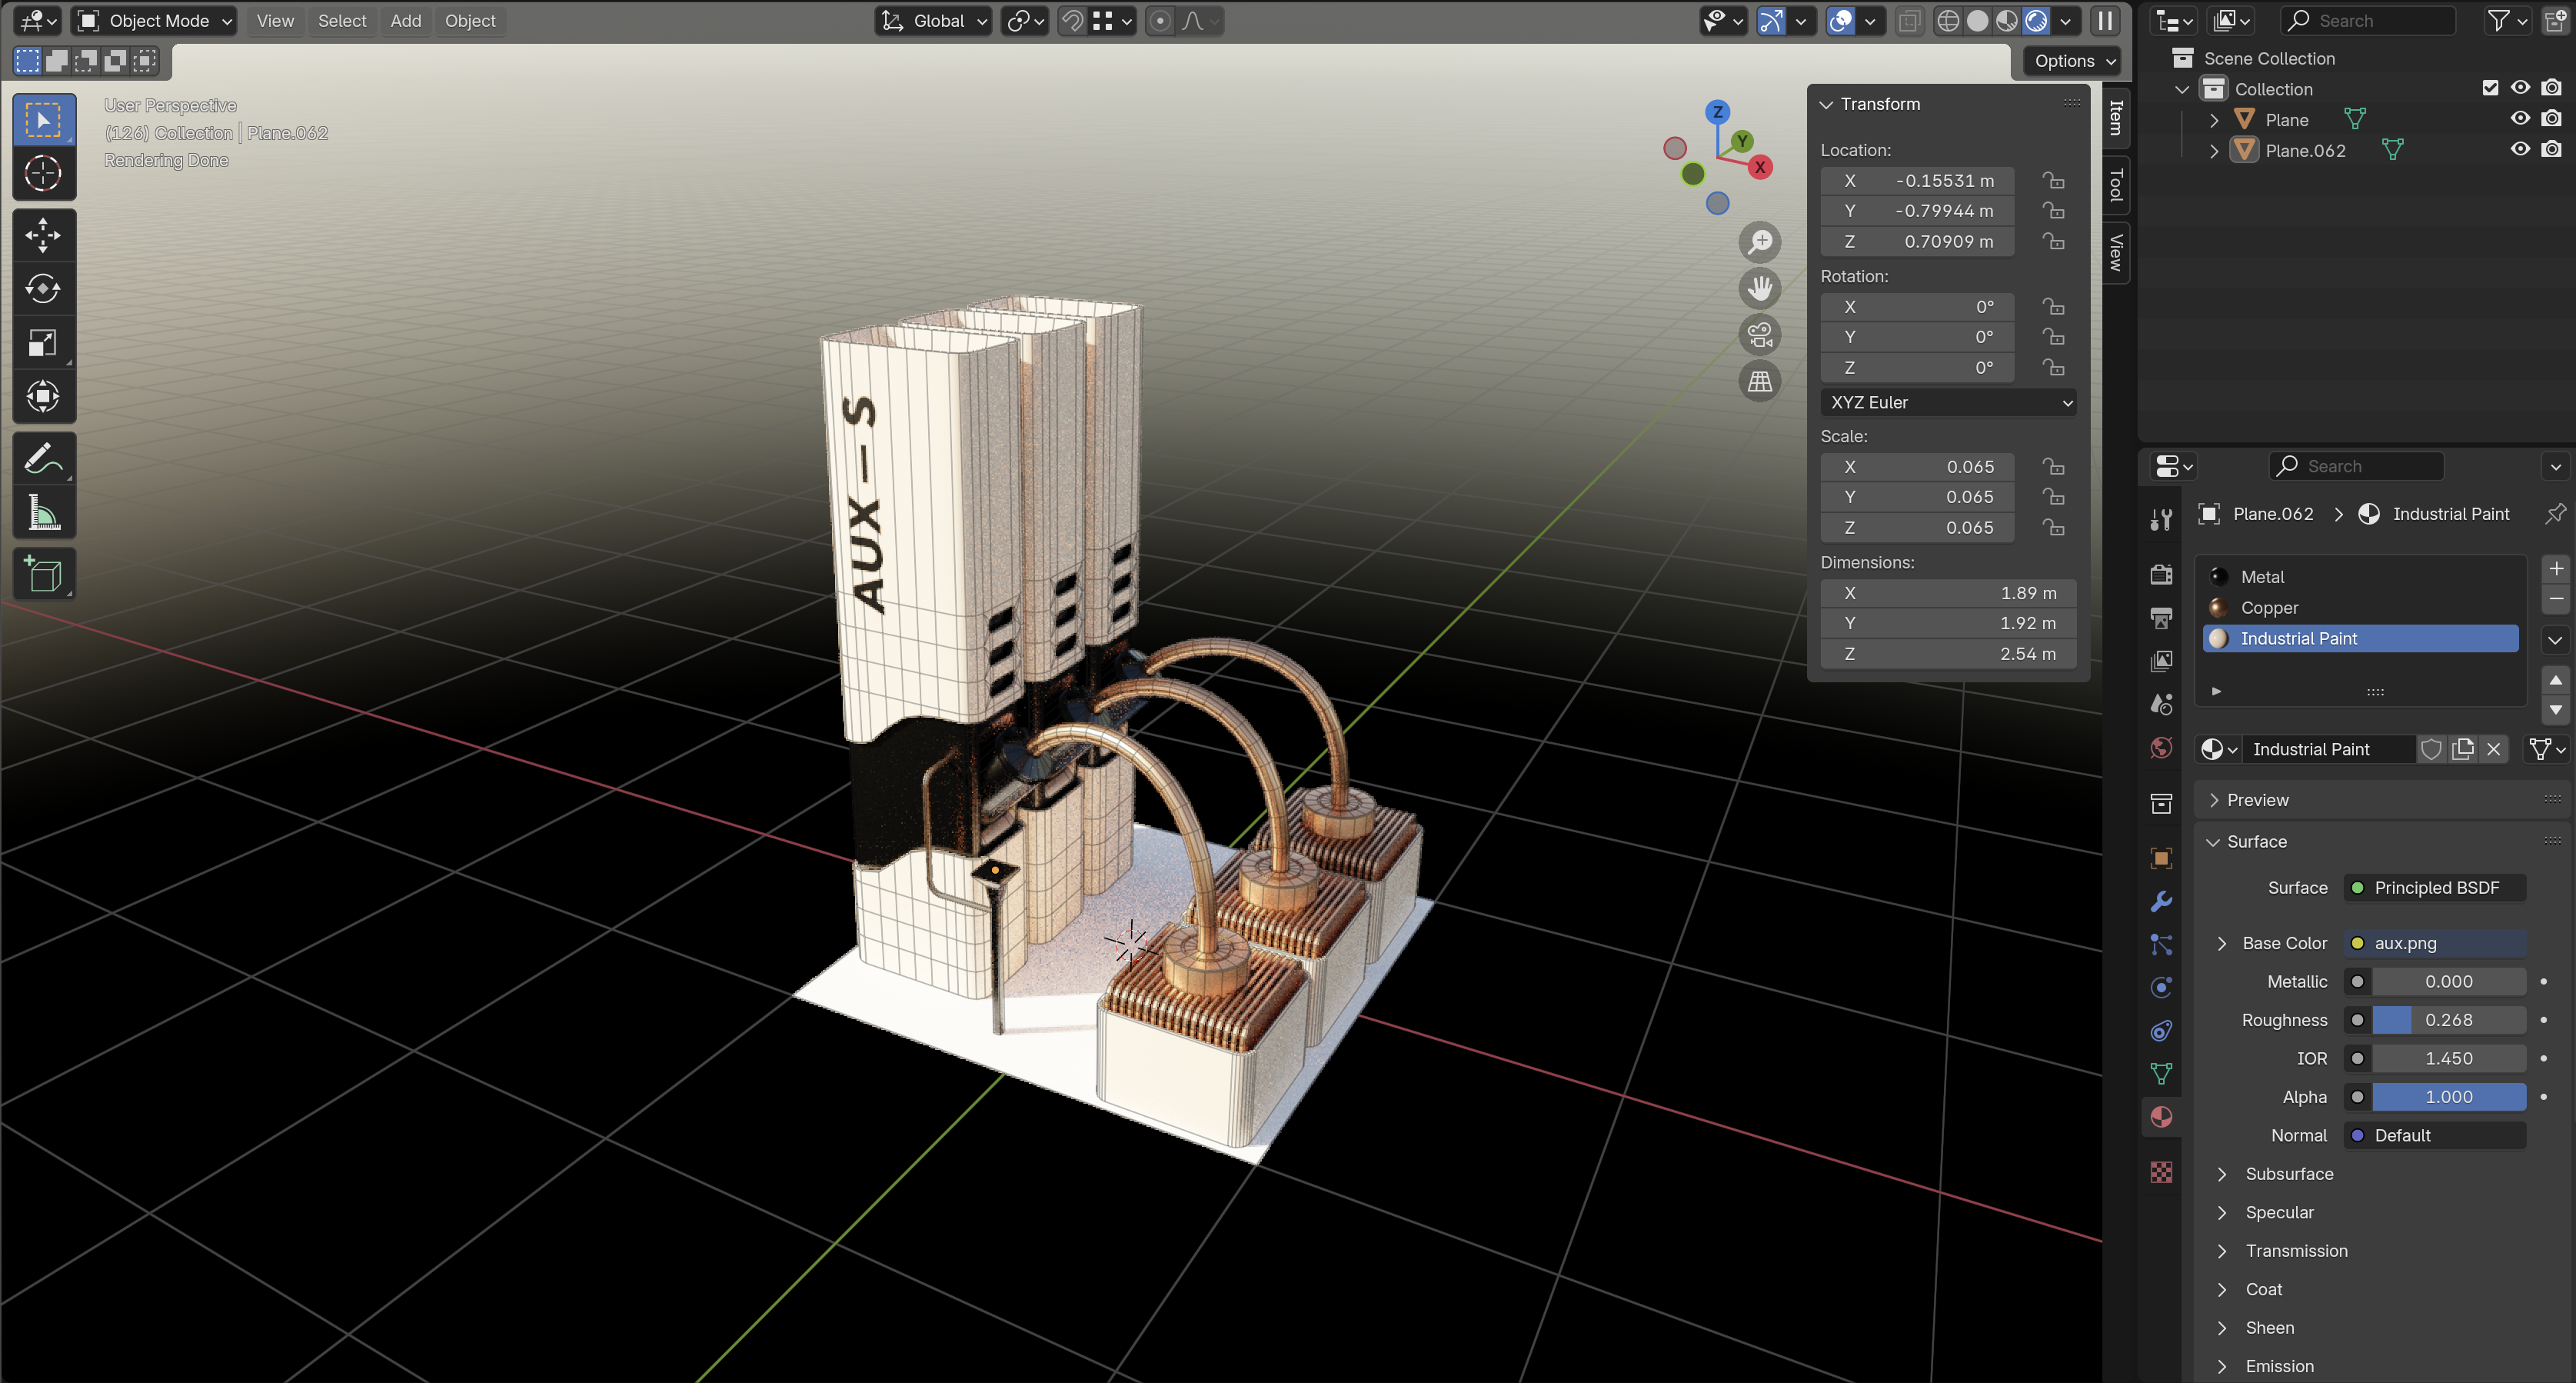
Models in the game designed in Blender. The main design principle is “keep the function in mind”. For instance the Pump Station is an evolution of the Auxiliary pump, so it seems reasonable that it could share some of the components from its predecessor, like a column, which sucks in air. The pump provides high pressure, and as the gas is compressed, it heats up. Therefore, adding a radiator to cool the air before it is injected underground makes sense to prevent the system from overheating. I must say this is a very fun way of designing stuff: you never stuck in a situation when you don’t know what to do. Just remember the function, and an idea will always come to mind.
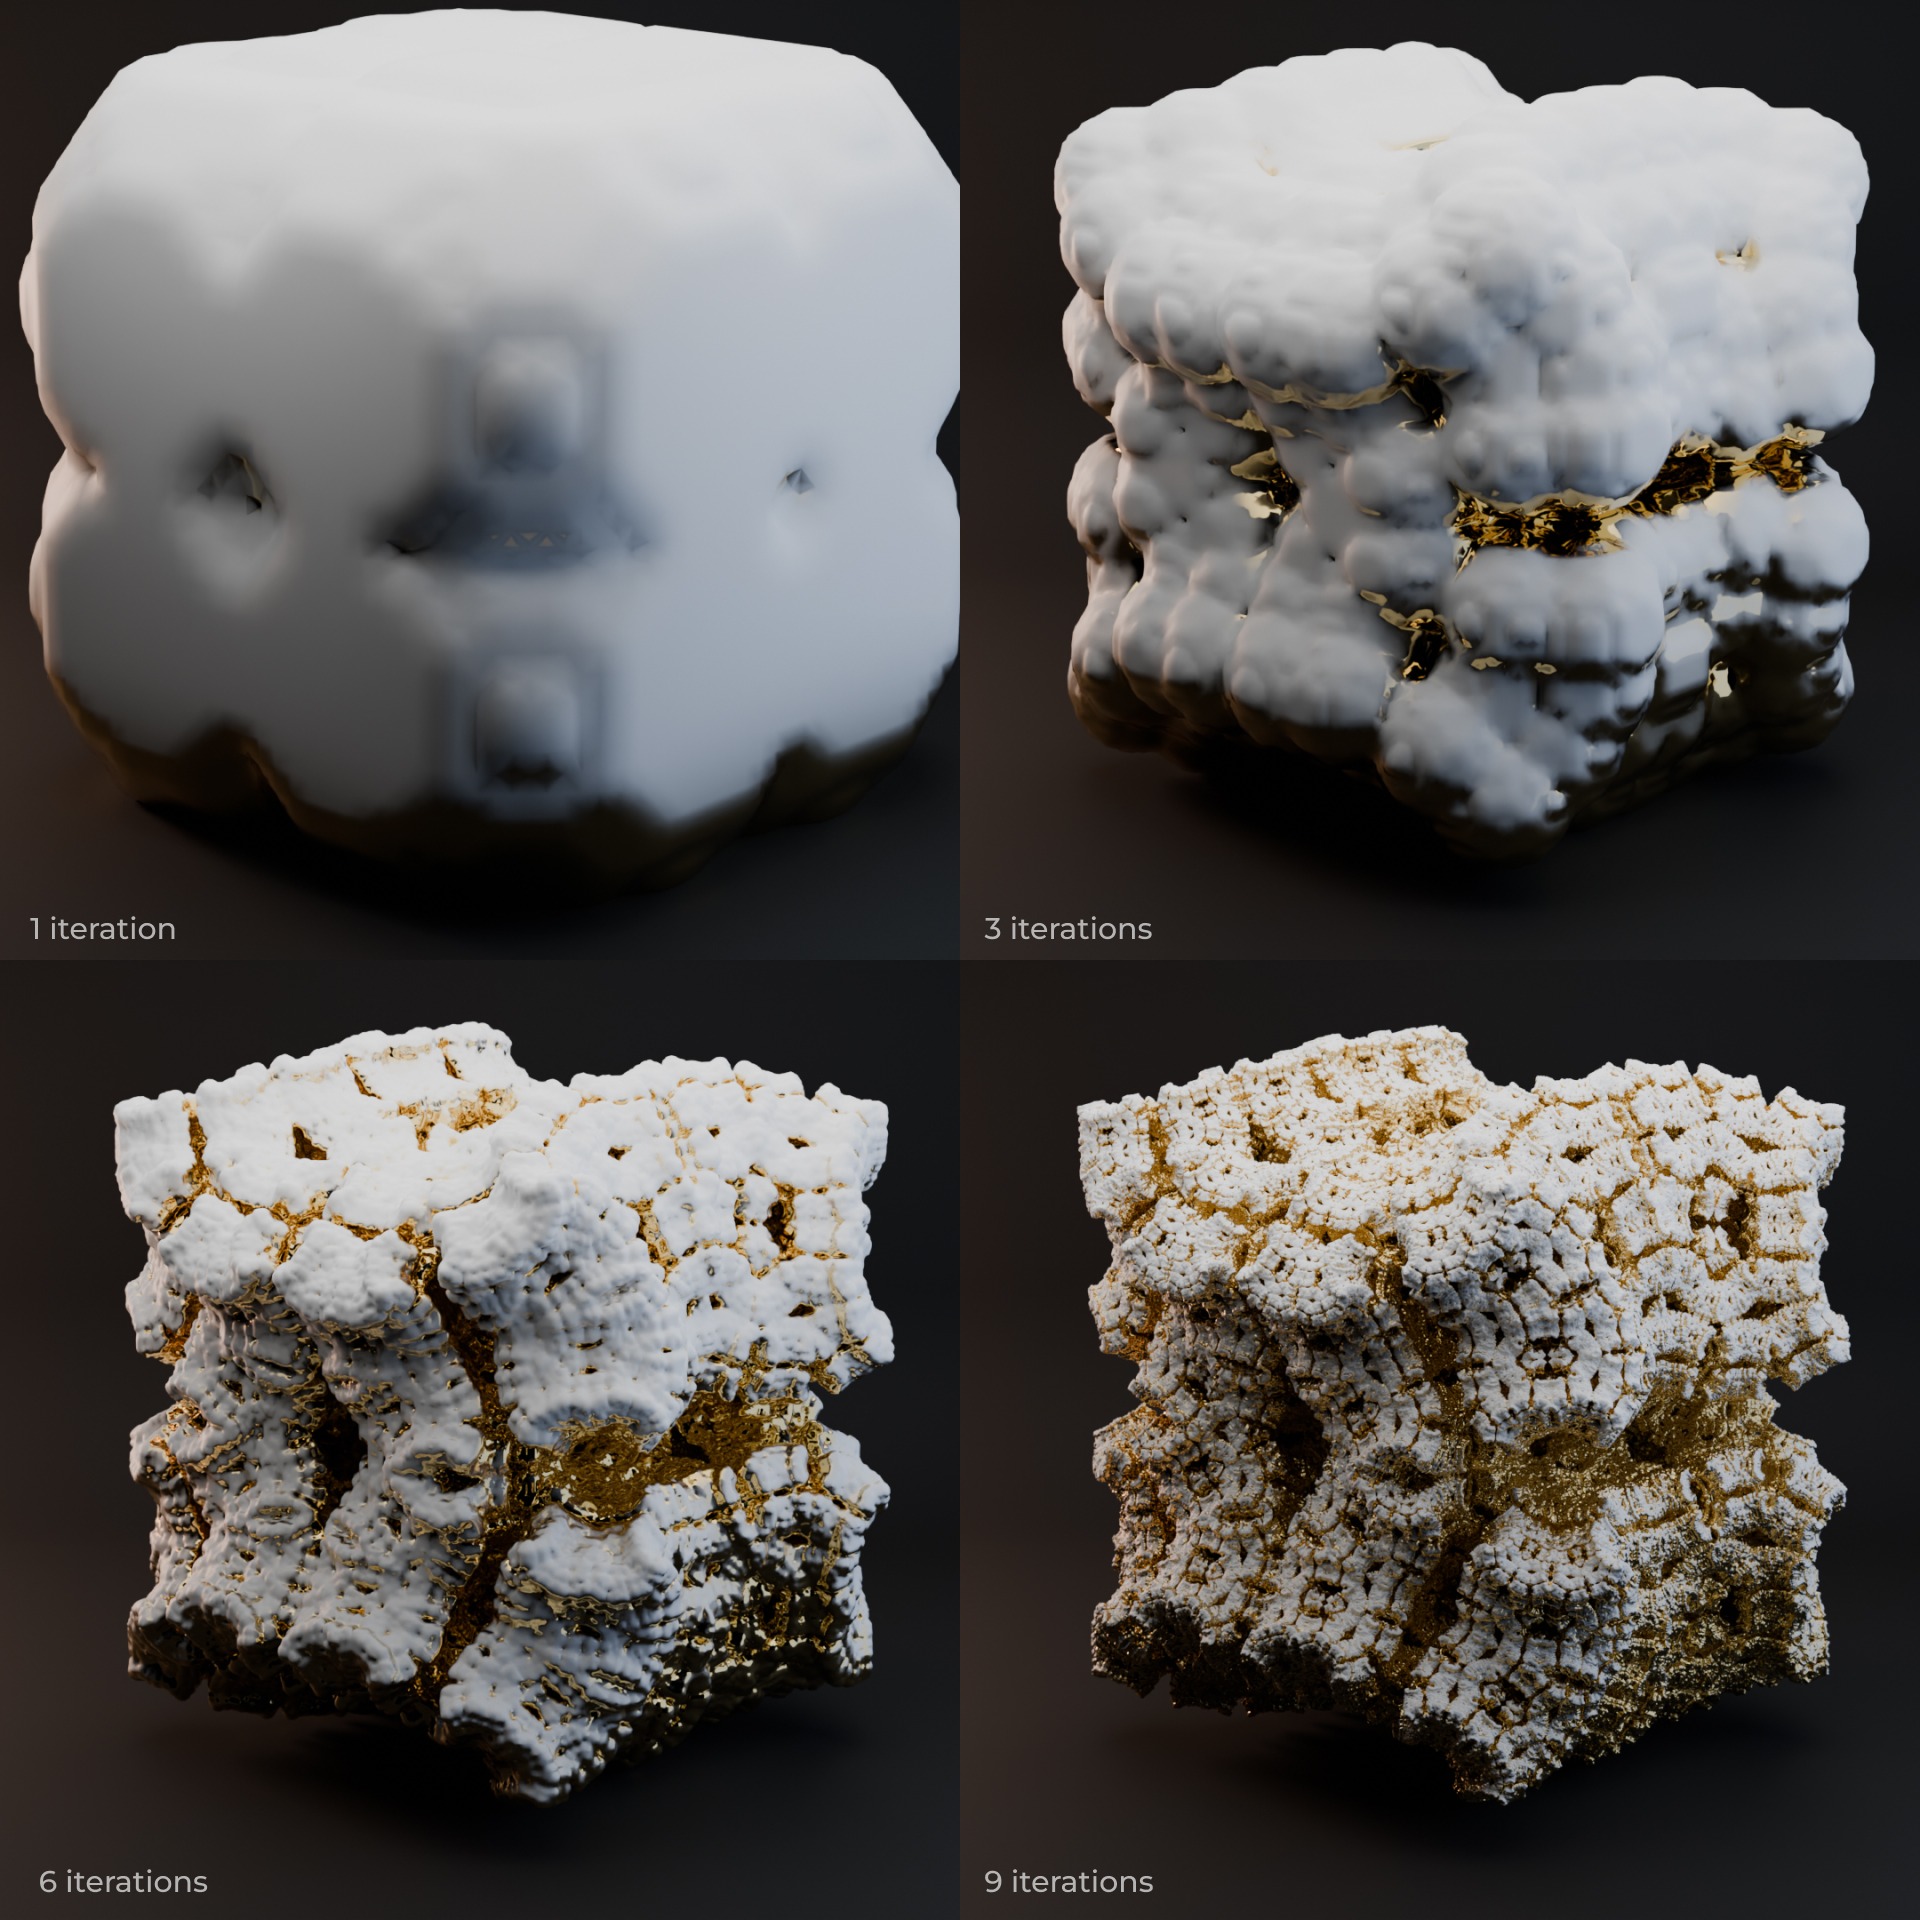
Some of the entities are not entirely hand-made. For example, the model for Strange Rock in the North is an instance of Kaleidoscopic Iterated Function System. It is a mathematical concept, where you start with a simple original shape, and then you get a complex fractal thing with consecutive transformations of the 3d space (axis swapping, mirroring, scaling, rotating etc.) It was a perfect timing for a Blender update to have necessary tools, so I could render this thing properly and add it to the game.
Conclusion
It was a great adventure to make this game. Thinking rationally, a developer doesn’t have to think about every small detail and it’s more efficient to choose right game engine, use libraries and buy assets. But for me it was the most fun part to do everything from scratch. It was challenging, but extremely rewarding. And I feel happy each time I find out that a person I don’t know enjoyed the game and decided to write or say about it. I hope to feel it again with the next game.
Play Sixty Four at https://store.steampowered.com/app/2659900/Sixty_Four/